Easy Camera Drawing Ideas: Learn To Draw A Camera!
Ever felt the urge to capture the intricate details of a classic camera, but your artistic skills felt lacking? Don't let that stop you with the right guidance, anyone can learn the art of camera drawing.
Despite the dominance of high-resolution smartphone cameras, the desire to sketch and create art remains strong. Learning to draw a camera, whether it's a vintage model or a modern DSLR, is a rewarding experience. This guide will walk you through the process, transforming your initial sketches into stunning, detailed illustrations. Forget complex tutorials; here, we break down the process into manageable steps, ensuring you'll create a piece you're proud of.
| Category | Information |
|---|---|
| Difficulty Level | Beginner-Friendly |
| Materials Needed | Pencil, Paper, Eraser, Optional: Colored Pencils/Markers |
| Focus | Step-by-step instructions for creating camera drawings. |
| Styles Covered | Realistic, Simple, Stylized |
| Additional Resources | Video tutorials, downloadable templates, and examples. |
| Website for Reference | DrawingNow.com |
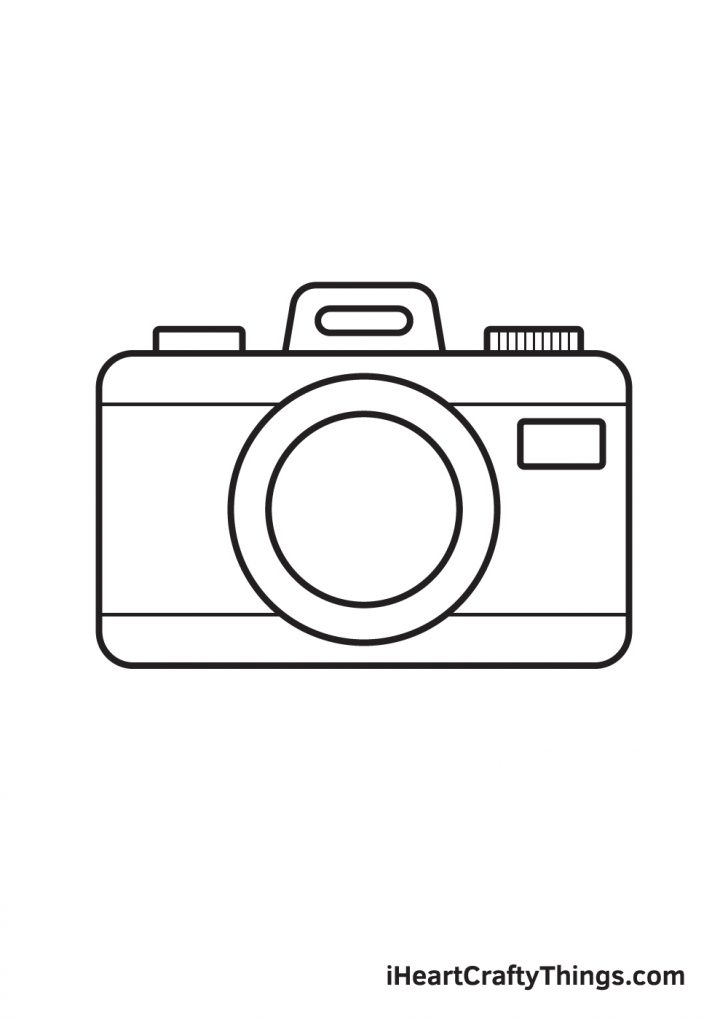
Let's begin with the fundamentals. Start by sketching basic shapes. Think of the camera as a collection of rectangles and circles. The main body is often a rectangle, while the lens is a prominent circle or a series of concentric circles. Focus on getting the proportions right in this initial stage. Lightly sketch these shapes, as they will serve as a foundation for the details.
- Untold Story Mount St Helens Eruption In 1980 Rare Photos
- Office Girls Viral Tiktoks Photos The Office Siren Trend
Next, define the camera's features. Draw the lens, adding details like the aperture ring and any visible glass elements. On the top of the camera body, sketch the shutter button, mode dial, and any other controls. Don't be afraid to use reference images to guide you. Observe the placement and size of each component carefully.
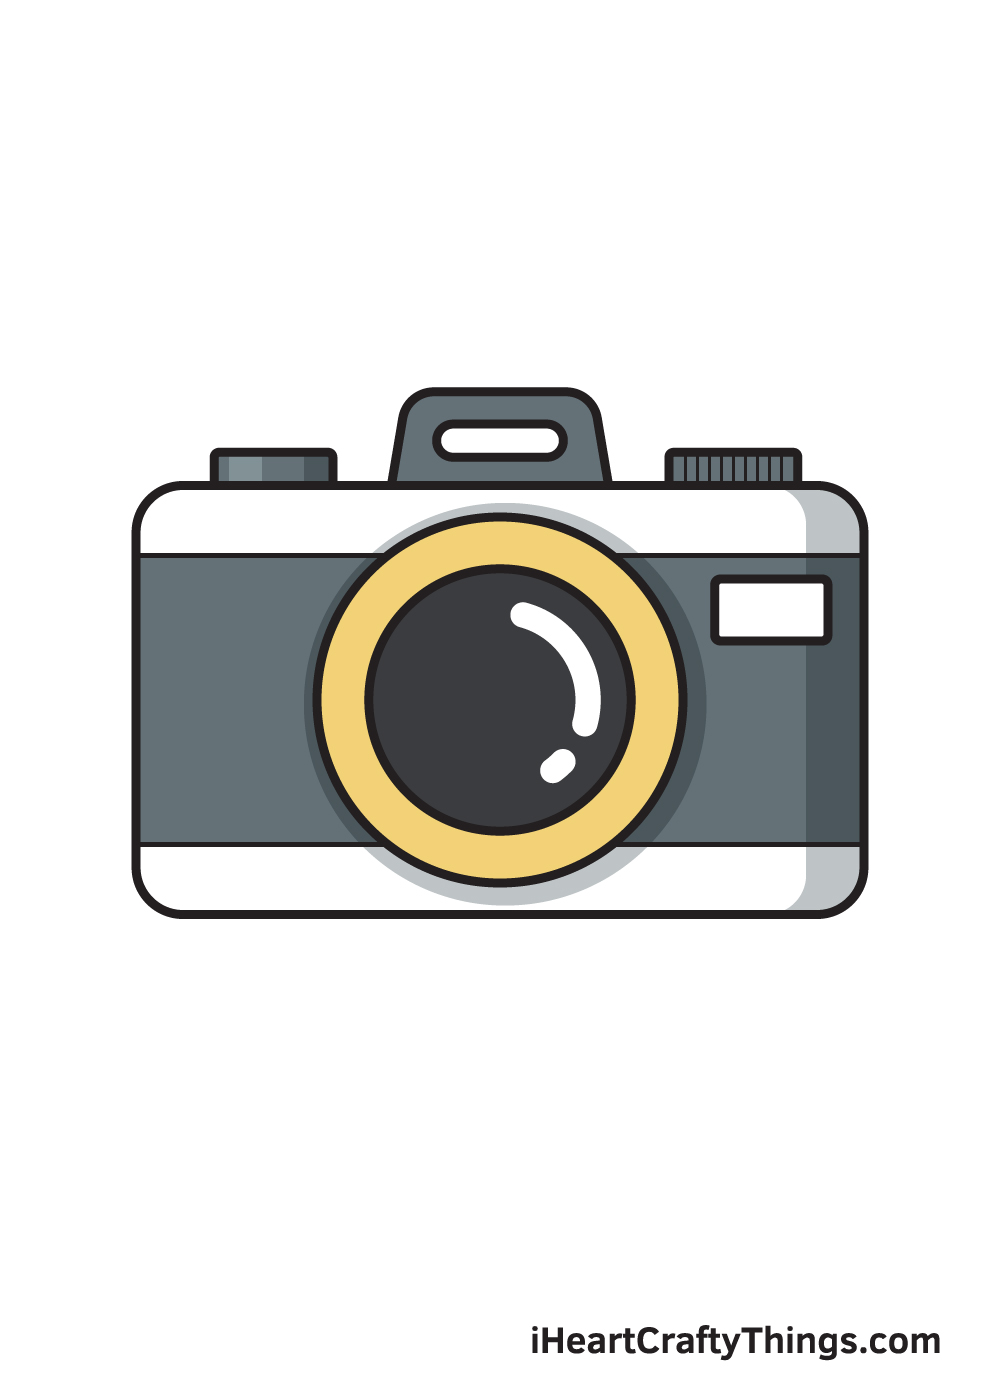
Adding depth and dimension is crucial. Begin by identifying the light source in your drawing. Areas that are directly hit by the light will be lighter, while areas in shadow will be darker. Use shading techniques like hatching, cross-hatching, or blending to create these tonal variations. Pay close attention to the contours of the camera, using shading to accentuate its form.
Bringing your camera drawing to life involves adding color. If you're using colored pencils or markers, experiment with different shades and hues to create a realistic effect. Consider the materials of the camera is it metallic, plastic, or leather? Each material will have a different texture and reflect light differently. Use color to convey these subtle nuances.
- San Francisco Bay Area Aerial Views See Stunning Photos More
- Karen Read Trial Chilling Bar Footage Revealed In Court
For those seeking inspiration, platforms like Pinterest offer a wealth of ideas for camera drawings. Explore different styles, from simple line drawings to highly detailed renderings. Studying the work of other artists can provide valuable insights and help you develop your own unique style.
Drawing a camera offers a unique opportunity to blend technical accuracy with artistic expression. Whether you're a beginner or an experienced artist, the process of capturing the form and details of a camera can be both challenging and rewarding. So grab your pencils, find a reference image, and start creating your own camera masterpiece.
Drawing a camera can be approached in various styles, each offering a unique artistic perspective. One popular method involves creating a realistic representation, meticulously capturing every detail of the camera's design. This requires careful observation and attention to proportions, shading, and texture.
Alternatively, you can opt for a simplified, cartoon-like style. This approach focuses on capturing the essence of the camera through basic shapes and bold lines. It's a great option for beginners or those who prefer a more whimsical aesthetic.
Another option is to experiment with abstract or stylized interpretations. This allows for greater creative freedom, where you can distort the camera's form, play with colors, and incorporate unique design elements. The key is to let your imagination guide you and create a drawing that reflects your personal style.
To begin your camera drawing, start by outlining the basic shape of the camera body. This will serve as the foundation for your drawing, providing a framework for adding details later on. Use light, gentle strokes to create this initial outline, as you may need to make adjustments as you progress.
Next, add the lens, which is a prominent feature of most cameras. Depending on the style you're going for, you can draw a simple circle or a more detailed representation of the lens elements. Pay attention to the size and placement of the lens in relation to the camera body.
Once you have the basic shapes in place, start adding details such as buttons, dials, and other features. Use reference images to guide you, ensuring that you accurately capture the camera's design. Don't be afraid to experiment and add your own personal touches to the drawing.
Shading is an essential technique for adding depth and dimension to your camera drawing. By carefully applying shadows and highlights, you can create a more realistic and visually appealing image. Consider the direction of the light source and use shading to accentuate the camera's form.
Coloring can further enhance your camera drawing, bringing it to life and adding personality. You can use colored pencils, markers, or digital painting tools to add color to your drawing. Experiment with different color schemes and techniques to achieve the desired effect.
In addition to traditional drawing methods, there are also digital tools and techniques that can be used to create camera illustrations. Software like Adobe Photoshop and Illustrator offer a wide range of features for creating detailed and visually stunning drawings.
One popular technique is to use a graphics tablet, which allows you to draw directly onto your computer screen. This provides a more natural and intuitive drawing experience, similar to drawing with a pencil on paper.
Another option is to use vector graphics software, which allows you to create scalable illustrations that can be resized without losing quality. This is particularly useful for creating camera clipart or illustrations that will be used in digital designs.
The camera lucida, a historical drawing aid, played a significant role in the quest for automated drawing techniques. Dating back to the Renaissance, artists sought mechanized methods to capture life through drawings. The camera lucida was a culmination of these efforts, offering a way to simplify the drawing process.
Linear perspective, a revolutionary set of graphic and mathematical rules, was introduced to create realistic drawings. Soon after its inception, artists devised ways to automate the drawing process from life. The camera lucida emerged as a tool that allowed artists to trace the image of an object onto paper, making drawing more accessible.
The camera lucida is not a camera in the modern sense but rather an optical instrument that helps artists create accurate drawings. It works by superimposing an image of the scene onto the drawing surface, allowing the artist to trace the outlines and details. This tool was particularly useful for creating architectural drawings, landscapes, and portraits.
While the camera lucida is no longer widely used, it remains an important part of art history. It represents a fascinating chapter in the ongoing quest to automate the drawing process and make art more accessible to everyone. Today, digital tools and techniques have largely replaced the camera lucida, but its legacy continues to inspire artists and designers.
The neolucida project aims to revive historical art technologies, such as the camera lucida, to help people draw. The project seeks to demystify drawing and explore how people, both past and present, learn to draw. By understanding the historical context of drawing tools and techniques, we can gain a deeper appreciation for the art of drawing and find new ways to make it more accessible.
The project also aims to promote creativity and artistic expression. By providing people with the tools and knowledge they need to draw, the neolucida project hopes to empower them to explore their artistic potential and express themselves through art. The project offers workshops, tutorials, and other resources to help people learn to draw and discover the joy of creating art.
The neolucida project is not just about reviving historical art technologies; it's also about exploring the future of drawing. By combining traditional drawing techniques with digital tools and technologies, the project seeks to create new and innovative ways to draw. The project is constantly experimenting with new methods and approaches, pushing the boundaries of what's possible in the world of drawing.
Learning to draw a camera is a great way to improve your drawing skills and explore your creativity. Whether you're a beginner or an experienced artist, there are plenty of resources available to help you learn. From step-by-step tutorials to online courses, you can find the resources you need to master the art of camera drawing.
So grab your pencils, find a reference image, and start creating your own camera masterpiece. With a little practice and patience, you'll be amazed at what you can achieve. Drawing a camera is a fun and rewarding experience that can bring you hours of enjoyment. Embrace the challenge and let your creativity flow.
To draw the basic shape, envision the camera's overall form. Start with a simple rectangle for the main body. This establishes the core structure upon which all other details will be built. Keep the lines light and erasable, as adjustments are inevitable.
The lens is the next crucial element. Depending on the camera type, this could be a circle, a cylinder, or a more complex arrangement of shapes. Position it centrally on the front of the body, paying close attention to its relative size.
Moving on to a more detailed outline, begin refining the basic shapes. Add curves, edges, and contours that define the camera's form. Observe the reference image carefully to capture subtle nuances. This stage requires patience and attention to detail.
Drawing the lens involves adding layers of complexity. Include the lens barrel, aperture ring, and any visible glass elements. Use shading to create the illusion of depth and roundness. Consider reflections and highlights to enhance the realism.
The remaining components include buttons, dials, and other features that adorn the camera body. Position them accurately based on your reference image. Pay attention to their size, shape, and placement. These details bring the camera to life.
Finalizing your outline means refining all the lines and shapes. Erase any unnecessary construction lines and ensure that the drawing is clean and crisp. This is the final step before adding shading and color. Take your time and make sure everything is perfect.
How to color the drawing depends on your chosen medium. Colored pencils, markers, and digital painting tools each offer unique possibilities. Experiment with different techniques to achieve the desired effect. Consider the materials of the camera metal, plastic, or leather and use color to convey their textures.
Detailed lighting and color involves adding subtle nuances to your drawing. Consider the direction of the light source and use shading to create depth and dimension. Highlights and reflections can add realism and bring the drawing to life. Pay attention to the interplay of light and shadow.
Exploring free graphic resources for camera drawing vectors, stock photos, and PSD files can provide inspiration and reference materials. Websites like Freepik offer a wide range of free images that can be used for commercial purposes. These resources can save you time and effort in your drawing process.
Ultimately, the goal is to create a camera drawing that captures your artistic vision. Whether you're aiming for realism, simplicity, or stylization, the process of drawing a camera can be a rewarding and enjoyable experience. So embrace the challenge and let your creativity guide you.
Learn how to draw a realistic camera with this easy guide that shows you every step of the process.
From sketching the basic shapes and proportions to shading and coloring, you'll create a stunning camera illustration in no time.
Learn how to draw a photo camera with this easy and simple drawing lesson by drawingeek.
Follow the steps and watch the video to create your own camera drawing.
Learn how to draw a camera in three different styles:
Follow the simple instructions and illustrations to create your own camera drawings.
On the other side of the camera's top, draw another, slightly larger rectangle.
Connect the rectangle to the camera body by drawing a short, curved line.
This forms another of the camera's controls.
Follow the sketching, outlining, and coloring tips to create your own camera illustration or clipart.
Our best drawings of camera if you're wondering how to draw such beautiful a camera drawings, open your favorite one and hit playeach drawing comes with a video showing the process!
Despite high resolution smartphone cameras in our pockets, people like to draw, and a lot of people have the desire to learn to draw.
So what is the neolucida project all about?
Reviving historical art technologies that help people draw, in order to:
Demystify drawing and explore how peoplepast and presentlearn to draw.
Find and save ideas about camera drawing on pinterest.
See more ideas about camera drawing, drawings, camera art.
Find & download free graphic resources for camera drawing vectors, stock photos & psd files.
Free for commercial use high quality images #freepik
Find and save ideas about drawing of camera on pinterest.
Its pretty fun to draw an old camera, but its not always easy.
Its especially true as not everyone has a camera in their home to use as a reference.
This guide will fix that, as i will show you how you can make your very own camera design which you can then change and customize!
With this easy camera drawing ideas, you can learn how to draw a camera easily.
In this tutorial, youll be guided through every step of the process to create a beautiful and realistic camera drawing.
Youll learn how to sketch the basic shapes and proportions of the camera, add details such as buttons and lenses, and shade the drawing to give it depth and dimension.
How to draw a photo camera easy and step by step.
Draw this photo camera by following this drawing lesson.
How to draw a camera in 3 versions will be described in this article!
Look and draw a beautiful camera with ease!
Learn how to draw a great looking camera with easy drawing instructions and video tutorial.
By following the simple steps, you too can easily draw a perfect camera.
Get free printable coloring page of this drawing
Snap a picture with this beginner how to draw a camera tutorial.
Use your drawing to create a camera clipart, stickers, photography illustrations, and more.
Discover drawing instructions and tips to create a realistic camera illustration.
In this video i will walk you step by step through the drawing techniques you will need to create your own camera pencil drawings.
On this channel you will find drawing tutorials for kids
Open the drawing tool step 2:
Draw the basic shape step 3:
Draw a more detailed outline step 4:
Drawing the lens step 5:
Draw the remaining components step 6:
Finalize your outline step 7:
How to color the drawing step 8:
Detailed lighting and color step 9:
The camera lucida was the latest in a quest for automated drawing stretching back to the renaissance.
Almost immediately after the invention of linear perspective a set of graphic and mathematical rules for constructing realistic drawingsartists proposed mechanized ways to draw from life.
Very nice video camera drawing, thanks a lot.
Add a review cancel reply.
You must be logged in to post a review.
Hi everyone, in this video i show you how to draw a camera step by step camera drawing easy.
Follow my step by step drawing tutorial and make your own ca
For the first time, get 1 free month of istock exclusive photos, illustrations, and more.
How to draw a camera easy step by step | camera drawing easy and simple for beginners draw easy hello friends,welcome to our you tube channel draw easyabout
Hi everyone,in today's drawing lesson i show you how to draw a camera easily!
Follow this step by step drawing tutorial and you are going to be able to make
- San Francisco Bay Area Aerial Views See Stunning Photos More
- Unfiltered Insights On Discover The Truth

Premium Vector Sketch of camera Sketch camera hand draw
Camera Drawing How To Draw A Camera Step By Step
Camera Drawing How To Draw A Camera Step By Step
